To create a client, open the client form, enter the client code, complete the required setup fields, review optional billing and client-level settings, then save the record. You can move through the form by selecting each tab or by using the arrow button at the bottom of the form.
Use Create a Client to add a new client record in Juris. After the client is saved, the Billing Address, Consolidation, and Matters options become available.
In this article
- Create the client record
- Complete the Code tab
- Complete the Billing tab
- Complete the INT/DISC tab
- Complete optional tabs
- Spell check and save the client
- Add related client information
Create the client record
-
Select Tables > Client.
- Open the Client form using one of the following options:
- Click the New icon.
- Select Form > New.
- Press Ctrl + N.
- Enter a Client Code.
Complete the Code tab
On the Code tab, enter or select the client information: 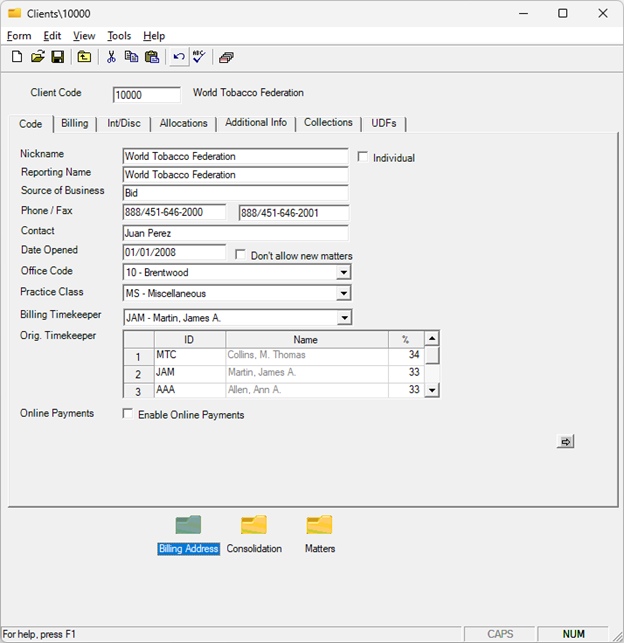
- Client Nickname: Enter 1-30 characters.
- Reporting Name: Enter 1-30 characters. This defaults from the Client Nickname but can be edited.
- Source of Business: Enter 1-30 characters.
- Phone/Fax Numbers: Enter 1-20 characters.
- Contact: Enter 1-30 characters.
- Date Opened: Enter a date, or accept the default current system date.
- Don’t allow new matters: Select this checkbox to prevent new matters from being added. If selected, choosing Matters > New displays a message that no new matters can be added.
- Office Code: Enter or select a valid office code.
- Billing Timekeeper: Enter or select a valid billing timekeeper.
- Practice Class Code: Enter or select a valid practice class code.
- Individual: Select this option if the client is an individual. If this option is not selected, Juris assumes the client is an organization.
- Originating Timekeeper(s) and percentage(s): Enter or select valid originating timekeepers and percentages. At least one originating timekeeper is required. The number of allowed timekeepers is 1-5, as determined in Firm Options.
- Enable Online Payments: Select this checkbox to enable online payments for the client. To disable online payments, clear the checkbox.
Complete the Billing tab
For detailed setup information, see Billing Agreements and Billing Frequencies.
On the Billing tab, enter or select the billing information:
- Fee Schedule Code: Determines the timekeeper rates used for the client.
- Task Code and Xref Code: Enter or select these codes, if applicable.
- Expense Schedule Code: Determines the amounts charged for expenses.
- Expense Code Xref Code: Enter or select this code, if applicable.
- Bill Format Code and Prebill Format Code: Select the formats to use for billing this client.
- Billing Agreement Code: Enter or select the billing agreement.
- Flat Fee Amount Includes Expenses: If the client uses a flat fee billing agreement, select this checkbox if the flat fee amount includes expenses. Any action to be taken on the billing agreement after posting a flat fee bill is determined in Firm Options.
- Retainer Type: Enter or select the retainer type, if applicable.
- Billing Frequency: Enter or select the billing frequency for expenses and fees. Any action to be taken on the billing frequency after posting a flat fee bill is determined in Firm Options.
- Billing Month: If the billing frequency is (Q)uarterly, (S)emiannually, or (A)nnually, enter the billing month.
- Cycle: If the billing frequency is (C)ycle, enter a cycle from 1-999.
- Billing Thresholds: Enter billing thresholds for expenses and fees.
Threshold defaults are established in Firm Options. Threshold billing is activated when prebills are printed By Frequency. When posted fees or expenses reach or exceed the threshold, the prebill is generated even if it falls outside the established billing frequency for that item.
If the prebill prints only because the fee threshold was met, only fees print. If the prebill prints because the expense threshold was met, only expenses print.
Bill attachments
Use the Bill Attachments drop-down list to specify whether existing attachments are included when printing bills for this client.
| Option | Result |
|---|---|
| Print attached expense files when printing bills | All expense attachments are included when printing bills, if present. |
| Do not print attached expense files when printing bills | Expense attachments are not printed with bills. |
| Print attached expense files when printing bills for expenses over $ | Attachments are included when the bill is over the specified amount. Enter the amount in the box to the right of the option. |
The default option for new clients can be set at the firm level. For more information, see Billing Tab.
Complete the INT/DISC tab
On the INT/DISC tab, enter or select the optional interest, discount, surcharge, tax, and budgeting settings:
- Interest Percent: Enter a percentage from 0.0000-100.0000%, if applicable.
- Interest Days: Enter 1-365 days. This is the grace period before interest begins to accrue on past due balances.
- Discount Option and Percent: Enter or select the discount option and percentage from 0.0000-100.0000%, if applicable.
- Surcharge Option and Percent: Enter or select the surcharge option and percentage from 0.0000-100.0000%, if applicable.
- Tax Exemption: Select tax exemption options, if applicable.
- Enable Budgeting: Select this checkbox, if applicable.
- Require Phase Numbers on all Transactions: If Enable Budgeting is selected, select this checkbox if phase numbers should be required on all transactions.
- Require Task Codes on all Time Entries: Select this checkbox, if applicable.
- Require Activity Codes on all Time Entries: Select this checkbox, if applicable.
- Require Task Codes on all Expenses: Select this checkbox, if applicable.
Defaults and the ability to change interest, surcharge, and discount settings are determined by Firm Options.
Complete optional tabs
Allocations tab
On the Allocations tab:
- Select an ID.
- Enter a percentage.
Each new line automatically populates the percentage field with a value that adds up to 100 percent.
Additional Info tab
On the Additional Info tab:
- Select a field in the left column.
- Click the ... button to open Text Codes for selection.
- Repeat for each applicable field, using the ... button to select a Text Code.
Collections tab
On the Collections tab:
- Select Collection Terms.
- Select Collection Status.
- Enter Additional Status, if appropriate.
Spell check and save the client
- Spell check the form using one of the following options:
- Click the Spell Check icon.
- Select Form > Spelling.
- Press F7.
- Save the client using one of the following options:
- Click the Save icon.
- Select Form > Save.
- Press Ctrl + S.
Add related client information
After the client is saved, the Billing Address, Consolidation, and Matters options become available.
Use these options to add related client information:
- Select Billing Address to enter a billing address. For more information, see Billing Address.
- Select Consolidation to create a consolidation, if applicable. For more information, see Create a Consolidation.
- Select Matters to create a matter for the client. For more information, see Matters Overview.
Clients can also be created in the Client Matter Intake module.